6.5 KiB
Led-Badge-44x11
Upload tool for an led name tag with USB-HID interface
Warning
There are many different versions of LED Badges on the market. This one uses an USB-HID interface, while others use USB-Serial (see references below).
The types supported by this project have an array of
- 44 x 11 LEDs or
- 48 x 12 LEDs.
The manufacturer is probably https://lesun-led.en.alibaba.com/
In both configurations, the badge identifies itself on the USB as
idVendor=0416, idProduct=5020
Mfr=1, Product=2, SerialNumber=0
LSicroelectronics LS32 Custm HID
Command Line Installation and Usage
User access to badge on all Linuxes
The following will install a udev rule allowing anybody read/write access to the badge via USB.
sudo cp 99-led-badge-44x11.rules /etc/udev/rules.d/
sudo udevadm control --reload-rules && sudo udevadm trigger
Required dependencies on Debian/Ubuntu Systems
sudo pip install pyhidapi
sudo pip install pillow
sudo apt-get install libhidapi-hidraw0
sudo ln -s /usr/lib/x86_64-linux-gnu/libhidapi-hidraw.so.0  /usr/local/lib/
or sudo apt install python3-usb python3-pil
Required dependencies on Mac Systems
sudo easy_install pip
pip install pyhidapi
pip install pillow
ruby -e "$(curl -fsSL https://raw.githubusercontent.com/Homebrew/install/master/install)" < /dev/null 2> /dev/null
brew install hidapi
or
Try with pip3 install pyhidapi
Required dependencies on Windows 10
Download win/inf-wizard.exe to your desktop. Right click 'Run as Administrator'
   -> Click 0x0416 0x5020 LS32 Custm HID
   -> Next -> Next -> Documents LS32_Sustm_HID.inf -> Save (we don't need that file)
   -> Install Now... -> Driver Install Complete -> OK

Download python from python.org
  [x] install Launcher for all Users
  [x] Add Python 3.7 to PATH
   -> Click the 'Install Now ...' text message.

Run cmd.exe as Administrator, enter:
  pip install pyusb
  pip install pillow
Required dependencies on Windows 7
Download win/win32-bin-1.2.6.0.zip to your desktop. Extract.
Find the inf-wizard.exe in the bin folder. Right click 'Run as Administrator'
Then continue as with windows 10 above.
Examples:
Sudo may or may not be needed for accessing the USB device, depending on your system.
sudo python3 ./led-badge-11x44.py "Hello World!"
loads the text 'Hello World!' as the first message, and scrolls it from right to left (default scroll mode=0) and speed 4 (default). After an upload the device shows the first message once and returns to the charging screen if still connected to USB. Either pull the plug or press the small button next to the USB connector.
sudo python3 ./led-badge-11x44.py -m 6 -s 8 "Hello" "World!"
loads the text 'Hello' as message one and 'World!' as message two. Compare the difference in quoting to the previous example. Up to 8 messages can be uploaded. This example uses mode 6, which drops the words with a nice little animation vertically into the display area. Speed is set to maximum here, for smoothness.
Per default you will only see 'Hello'. To see all messages, press the small button next to the USB connector multiple times, until you briefly see 'M1-8'. Now the display loops through all uploaded messages.
sudo python3 ./led-badge-11x44.py -m 5 :gfx/fablabnbg_logo_44x11.png:
loads a fullscreen still image. Avoid whitespace between colons and name.
sudo python3 ./led-badge-11x44.py "I:HEART2:my:gfx/fablab_logo_16x11.png:fablab:1:"
uses one builtin and one loaded image. The heart is builtin, and the fablab-logo is loaded from file. The fablab logo is used twice, once before the word 'fablab' and again behind through the reference ':1:' (which references the first loaded image).
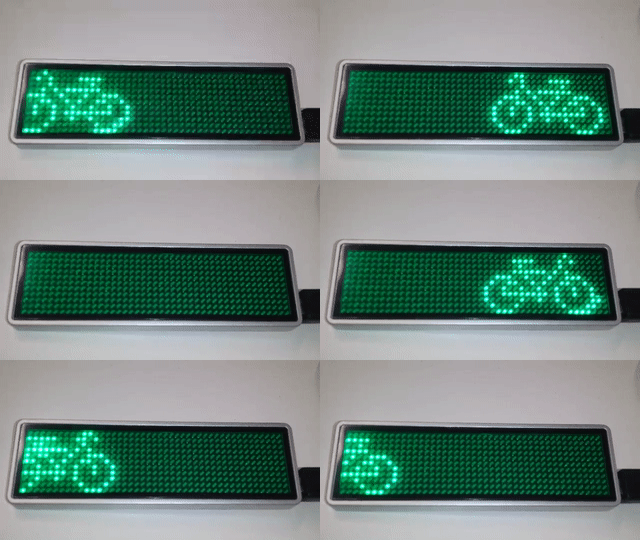
sudo python3 ./led-badge-11x44.py -s7 -m0,1 :bicycle: :bicycle_r:
shows a bicycle crossing the display in left-to-right and right-to-left (as a second message). If you select the 'M1-8' mode, the bike permanently runs back and forth the display. You may add a short message to one or both, to make it appear the bike is pulling the text around.
sudo python3 ./led-badge-11-x44.py -b0,1 -s1 -m5 " :heart2: :HEART2:" " :HEART2:"
shows a simple animation of a slowly beating heart on the first message, and a blinking heart on the second message.
python3 ./led-badge-11x44.py --list-names
prints the list of builtin icon names, including :happy: :happy2: ❤️ :HEART: :heart2: :HEART2: :fablab: :bicycle: :bicycle_r: :owncloud: ::
python3 ./led-badge-11x44.py --help
prints some condensed help:
usage: led-badge-11x44.py [-h] [-t TYPE] [-s SPEED] [-m MODE] [-b BLINK]
			  [-a ANTS] [-p FILE] [-l]
                          MESSAGE [MESSAGE ...]

Upload messages or graphics to a 44x11 led badge via USB HID.
Version 0.6 from https://github.com/jnweiger/led-badge-44x11
 -- see there for more examples and for updates.

positional arguments:
  MESSAGE               Up to 8 message texts with embedded builtin icons or
                        loaded images within colons(:) -- See -l for a list of
                        builtins

optional arguments:
  -h, --help            show this help message and exit
  -t TYPE, --type TYPE
			Type of display: supported values are 12x48 or
			(default) 11x44. Rename the program to led-badge-12x48,
			to switch the default.
  -s SPEED, --speed SPEED
                        Scroll speed (Range 1..8). Up to 8 comma-seperated
                        values
  -m MODE, --mode MODE  Up to 8 mode values: Scroll-left(0) -right(1) -up(2)
                        -down(3); still-centered(4); animation(5); drop-
                        down(6); curtain(7); laser(8); See '--mode-help' for
                        more details.
  -b BLINK, --blink BLINK
                        1: blinking, 0: normal. Up to 8 comma-seperated values
  -a ANTS, --ants ANTS  1: animated border, 0: normal. Up to 8 comma-seperated
                        values
  -l, --list-names      list named icons to be embedded in messages and exit

Example combining image and text:
 sudo ./led-badge-11x44.py "I:HEART2:you"


